You’re looking to discover a wonderfully accessible way to begin your yoga practice, and seated poses are your perfect starting point. Forget the idea that yoga requires extreme flexibility or contorting your body into seemingly impossible shapes. You can unlock many of the practice’s benefits right from the comfort of a chair or your own seat on the floor. This approach welcomes everyone, regardless of your current physical condition or prior fitness experiences. You’ll find that focusing your attention on your breath and the gentle movements of your body from a stable seated position can foster a deep sense of calm and awareness.
Getting Started with Seated Yoga
You might feel a little uncertain about where to begin, and that’s completely normal. Seated yoga offers a gentle introduction. You don’t need any special equipment to get started; a comfortable surface like a yoga mat or even a rug on your floor will suffice. If you opt for chair yoga, any sturdy chair without wheels will work. The most important thing is to create a space where you feel relaxed and undisturbed. Clear a small area around you, allowing for a bit of movement. You might want to have a cushion or folded blanket nearby to support your hips if you’re sitting on the floor, helping you maintain a more upright posture. Remember, the goal is not to push yourself but to explore your body’s capabilities with kindness and patience. You’ll find that as you practice regularly, your awareness of your posture and your breath will naturally grow.
Finding Your Seat
You have a couple of primary options for your seated practice: the floor or a chair. Each offers its unique advantages. Sitting directly on the floor, perhaps cross-legged, can promote a sense of grounding. If your hips feel tight, don’t force a full cross-legged position. You can sit with your legs extended or even prop yourself up on a cushion or folded blanket. This prop helps tilt your pelvis forward, making it easier to keep your spine long. Your knees might be higher than your hips, and that’s perfectly fine.
Alternatively, you can utilize a chair. This is an excellent option if sitting on the floor is uncomfortable or challenging for you. Sit on the edge of the chair with your feet flat on the floor, hip-width apart. Ensure your knees are bent at roughly a 90-degree angle. This position offers a stable base and allows you to focus on the upper body and breath work. You can adapt almost all seated yoga poses to a chair, making it an incredibly versatile tool for your practice.
Understanding Your Breath
Your breath is a fundamental tool in yoga, acting as an anchor for your attention and a guide for your movement. When you’re seated, it becomes even easier to focus on this vital aspect of your practice. You are not trying to control your breath in a forceful way, but rather to observe it and allow it to flow naturally.
The Power of Deep Breathing
When you begin a seated yoga session, take a moment to simply notice your breath without trying to change it. Feel the air entering and leaving your nostrils. Then, gently encourage your breath to deepen. Imagine filling your belly with air as you inhale, feeling your abdomen expand. As you exhale, feel your abdomen soften. This diaphragmatic breathing is incredibly calming for the nervous system. Try to make your inhales and exhales roughly equal in length. You might even count gently to yourself: inhale for a count of four, exhale for a count of four.
Connecting Breath to Movement
As you move through poses, you’ll discover how your breath can inform your actions. For instance, you might inhale as you lengthen your spine and exhale as you gently fold forward. This synchronizing of breath and movement adds a fluid, mindful dimension to your practice. It helps you move with intention rather than just going through the motions. When you feel tension in a stretch, consciously soften and exhale, releasing that tightness. Your breath becomes a conversation with your body, a way to communicate comfort and invite release.
Accessible Poses for Beginners
You are now ready to explore some foundational seated yoga poses. These are designed to be simple, effective, and adaptable to your individual needs. You’ll feel the benefits of increased circulation, improved posture, and a calmer mind without any strain. Remember to listen to your body at all times, and never push into discomfort.
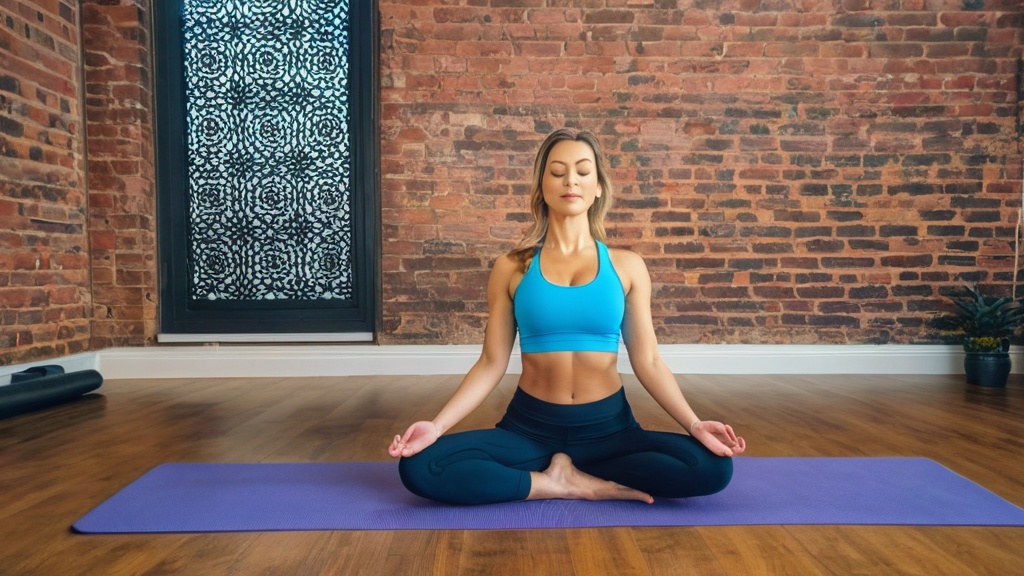
Easy Pose (Sukhasana)
This is the quintessential seated yoga pose, and its name says it all: it’s easy! You can practice this on the floor or in a chair.
On the Floor:
Sit on your mat or cushion. Cross your legs in a comfortable position. If your knees are high or you feel strain, place a cushion or folded blanket under your hips. Allow your knees to relax outwards. Rest your hands on your knees, palms facing up or down, whichever feels more comfortable. Gently lengthen your spine, as if a string is gently pulling the crown of your head upwards. Relax your shoulders away from your ears. Close your eyes if you wish, and focus on your breath. You can hold this pose for 1 to 5 minutes, or simply use it as a comfortable starting position for your practice.
In a Chair:
Sit on the edge of your chair with your feet flat on the floor, hip-width apart. Cross your right shin over your left shin, or simply find a comfortable crossing of your legs if full crossing isn’t easy. Rest your hands on your knees. Lengthen your spine and relax your shoulders. Breathe deeply.
Staff Pose (Dandasana)
This pose might seem very simple, but it’s a powerful pose for establishing good posture and spinal alignment.
On the Floor:
Sit on your mat with your legs extended straight out in front of you. Flex your feet, pointing your toes towards the ceiling. Press your hands into the floor beside your hips, fingers pointing forward. Imagine your body is “staff-like,” strong and upright. Lengthen your spine, drawing your shoulders down and back. Engage your thigh muscles gently. You are not slouching; you are actively sitting upright. Hold this pose for several breaths, feeling the strength in your grounded posture. If sitting upright with straight legs is difficult due to tight hamstrings, you can place a folded blanket under your hips to help tilt your pelvis forward.
In a Chair:
Sit on the edge of your chair with your feet flat on the floor, hip-width apart. Extend your legs straight out in front of you if your chair allows, or simply keep them parallel and slightly separated. You can place your hands on the chair’s armrests or on your thighs. Press down through your feet and lengthen your spine. Imagine you are sitting very tall, as if you’re wearing a crown. Relax your shoulders.
Poses for Spinal Mobility
Your spine is the central support system of your body. Seated poses offer a gentle way to bring awareness and mobility to this vital area. You can introduce subtle movements that help release tension and improve your range of motion.
Seated Cat-Cow Pose (Marjaryasana-Bitilasana variation)
This is a wonderful pose for warming up your spine and connecting breath with movement.
On the Floor:
Begin in Easy Pose, sitting comfortably cross-legged on your mat. Place your hands on your knees.
Inhale: Gently arch your back, drawing your chest forward and lifting your gaze slightly. Feel a gentle stretch across your chest and abdomen.
Exhale: Round your spine, tucking your chin towards your chest and drawing your navel towards your spine. Feel a stretch across your upper back.
Continue to flow between these two movements, synchronizing with your breath. You can make the movements as subtle or as pronounced as feels comfortable for you. Aim for several rounds of this gentle spinal articulation.
In a Chair:
Sit on the edge of your chair with your feet flat on the floor. Place your hands on your knees.
Inhale: Gently arch your back, drawing your chest forward and lifting your gaze slightly. Feel your shoulders draw back.
Exhale: Round your spine, tucking your chin towards your chest and drawing your navel towards your spine. Feel your shoulder blades spread apart.
Repeat this for several breaths, moving with your inhale and exhale.
Seated Spinal Twist (Ardha Matsyendrasana variation)
Twists are excellent for detoxifying the body and releasing tension along the spine.
On the Floor:
Start in Staff Pose with your legs extended. Bend your right knee and bring your right foot to the floor outside your left thigh. If this is too intense, you can bring your right foot to the inside of your left thigh.
Press your left leg straight, or you can bend your left knee and draw your left heel towards your right hip, if that’s comfortable.
Place your right hand on the floor behind you for support; imagine it’s an extension of your spine.
Inhale: Lengthen your spine.
Exhale: Gently twist your torso to the right. Bring your left elbow to the outside of your right knee, or simply hug your right knee with your left arm.
Look over your right shoulder if comfortable for your neck, or keep your chin parallel to the floor. Keep both sit bones grounded. Hold for several breaths, feeling the gentle compression and expansion in your torso.
To release, inhale and slowly untwist. Repeat on the other side.
In a Chair:
Sit on the edge of your chair with your feet flat on the floor, hip-width apart.
Inhale: Lengthen your spine.
Exhale: Gently twist your torso to the right. You can bring your left elbow to the outside of your right knee, or simply hug your right knee with your left arm. The other hand can rest on the back of the chair or on your thigh.
Look over your right shoulder if comfortable for your neck, or keep your chin parallel to the floor. Keep your hips facing forward as much as possible, twisting from the torso. Hold for several breaths.
To release, inhale and slowly untwist to center. Repeat on the other side.
Poses for Hip and Leg Opening
Your hips can hold a lot of tension, and gentle opening can bring a sense of release and improved mobility. These seated poses offer a kind way to work with your hips and the backs of your legs.
Butterfly Pose (Baddha Konasana)
This pose is a classic for opening the hips and groin area.
On the Floor:
Sit on your mat. Bring the soles of your feet together, letting your knees fall out to the sides. You can bring your heels as close to your body as is comfortable.
Hold onto your ankles or your feet. If your hips feel tight, you can place blocks or folded blankets under your knees for support.
Inhale: Lengthen your spine, sitting tall.
Exhale: Gently hinge forward from your hips, keeping your spine long. You don’t need to touch your forehead to your feet; the gentle forward lean is enough.
Focus on breathing into your hips and groin. Hold for several breaths, allowing gravity to do some of the work.
In a Chair:
Sit on the edge of your chair with your feet flat on the floor.
Bring the soles of your feet together. Allow your knees to fall out to the sides as comfortably as possible. You can use your hands to gently guide your feet closer to your torso if you wish, but don’t force it.
Rest your hands on your knees or shins. Inhale and lengthen your spine. You can stay here, or exhale and gently lean forward from your hips, keeping your spine long.
Breathe into the sensation in your inner thighs and hips.
Seated Forward Fold (Paschimottanasana variation)
This pose offers a gentle stretch for the hamstrings and the entire back body.
On the Floor:
Begin in Staff Pose with your legs extended straight in front of you. Flex your feet.
Inhale: Lengthen your spine, reaching your arms overhead.
Exhale: Hinge forward from your hips, keeping your spine long. Reach your hands towards your feet, shins, or even the floor beside your legs. It’s more important to keep your spine long than to touch your toes.
If your hamstrings are tight, it’s perfectly okay to bend your knees. You can also place a rolled-up blanket under your knees. Focus on creating length in your spine as you fold. Hold for several breaths, feeling the stretch in the back of your legs and your spine.
In a Chair:
Sit on the edge of your chair with your feet flat on the floor, hip-width apart. Extend your legs straight out in front of you if possible, or keep them parallel.
Inhale: Lengthen your spine, reaching your arms up.
Exhale: Hinge forward from your hips, keeping your spine long. You can rest your hands on your shins or the seat of the chair.
Focus on maintaining a long spine rather than a deep bend. You can bend your knees more if needed. Breathe into the stretch along the back of your legs and your back.
Poses for Relaxation and Grounding
After exploring movement, you’ll want to bring your practice to a close with poses that encourage rest and a sense of calm. These poses allow you to integrate the benefits of your practice and leave you feeling refreshed.
Seated Heart Opener
This pose is designed to gently open the chest and encourage a feeling of openness and ease in the upper body.
On the Floor:
Return to your comfortable seated position, Easy Pose.
Bring your hands behind your back and interlace your fingers. If interlacing is difficult, you can hold a strap or towel between your hands.
Inhale: Gently straighten your arms, drawing your knuckles towards each other. Press your chest forward and lift your gaze slightly. Feel the chest opening and your shoulder blades drawing together.
Exhale: Release any tension in your shoulders.
Hold for several breaths, feeling the release across your collarbones and chest. This pose can help counteract the effects of slouching.
In a Chair:
Sit on the edge of your chair with your feet flat on the floor.
Bring your hands behind your back and interlace your fingers. If interlacing is difficult, you can hold a strap or towel between your hands.
Inhale: Gently straighten your arms, drawing your knuckles towards each other. Press your chest forward and lift your gaze slightly. Feel your shoulder blades drawing together.
Exhale: Relax your shoulders.
Hold for several breaths.
Corpse Pose (Savasana) variation for seated practice
While traditionally practiced lying down, you can achieve a similar resting state while seated.
In a Chair:
Sit comfortably in your chair, with your feet flat on the floor. Allow your spine to be long but relaxed.
Rest your hands on your thighs, palms facing up, or allow them to rest in your lap.
Close your eyes gently.
Allow your breath to return to its natural, effortless rhythm.
Let go of any effort in your body. Feel the support of the chair beneath you.
Scan your body from your toes to the crown of your head, consciously releasing any remaining tension you find.
Remain in this state of restful awareness for 5-10 minutes, or as long as you feel comfortable. This is your time to simply be.
On the Floor:
If you are on the floor and find lying down is not an option, you can modify Savasana. Sit comfortably in Easy Pose. You can rest your head on a cushion placed in front of you, or find a comfortable resting position for your arms. Close your eyes and allow your body to be heavy. Focus on your breath and the feeling of release.
You have now experienced a selection of easy seated yoga poses that you can readily incorporate into your personal practice. Remember, consistency is key. Even a few minutes each day can make a profound difference in how you feel, both physically and mentally. You’ve opened a door to a practice that is kind, adaptable, and deeply rewarding, all from the comfort of your chosen seat.
FAQs
What are seated yoga postures?
Seated yoga postures are yoga poses that are performed while sitting on the ground or on a chair. These postures focus on stretching and strengthening the muscles, improving flexibility, and promoting relaxation.
What are the benefits of seated yoga postures for beginners?
Seated yoga postures are beneficial for beginners as they help in improving posture, increasing flexibility, reducing stress, and promoting relaxation. These postures also help in strengthening the core muscles and improving overall body awareness.
Are seated yoga postures suitable for everyone?
Seated yoga postures are suitable for people of all ages and fitness levels, including beginners. They can be modified to accommodate individuals with physical limitations or injuries, making them accessible to a wide range of people.
How can beginners get started with seated yoga postures?
Beginners can start with simple seated yoga postures such as easy pose (Sukhasana), seated forward bend (Paschimottanasana), and seated spinal twist (Ardha Matsyendrasana). It is important to focus on proper alignment, breathing, and listening to the body’s limits while practicing these postures.
What should beginners keep in mind while practicing seated yoga postures?
Beginners should remember to listen to their bodies, practice proper breathing techniques, and avoid pushing themselves too hard. It is important to start slowly, gradually increase the duration and intensity of the postures, and seek guidance from a qualified yoga instructor if needed.


